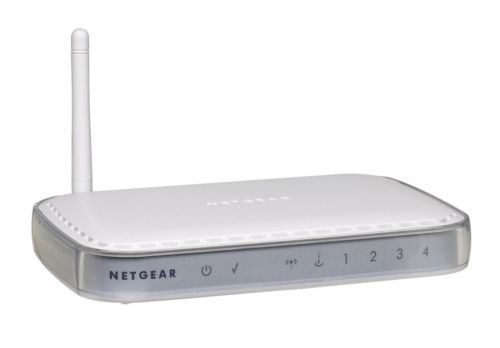
 As I’ve written about previously, a great place to pick up outdated, and potentially vulnerable, wireless routers is your local Goodwill. Depending on the store those shelves can be packed with devices for only a couple bucks. While you are there you can just Google the model number followed by “exploit”, “openwrt”, or “dd-wrt” to see if you have a device worth playing with. Today I got a Netgear WGT624v2 which dates back to POTUS 43’s first term. I will detail a different adventure than my previous post. When cracking open this device I was greeted with two pre-populated headers! We will use the JTAGulator and Dangerous Prototypes BusBlaster v4 to get access via UART and JTAG.
WikiDevi provides some details on this device but other information is missing or incorrect. Here we will fill in the gaps. The main chip listed on the wiki is the Atheros AR2313 but this device has the same chip (AR2312A) as version 1. When packaged with wireless AR2112A chip it is referred to as AR5002AP-G. with the The SDRAM is a Winbond W981216BH-75. On this device the flash chip is a Macronix International mx29lv320t-90 which is 4mb of storage just like version 1 of this device. The openwrt wiki says this version should only have 2mb of flash storage. Some Googling reveals questions on how to debrick these devices after an official Netgear firmware update. It may have something to do with the boards being difference for the same “version”. No matter, we will work with what we got!
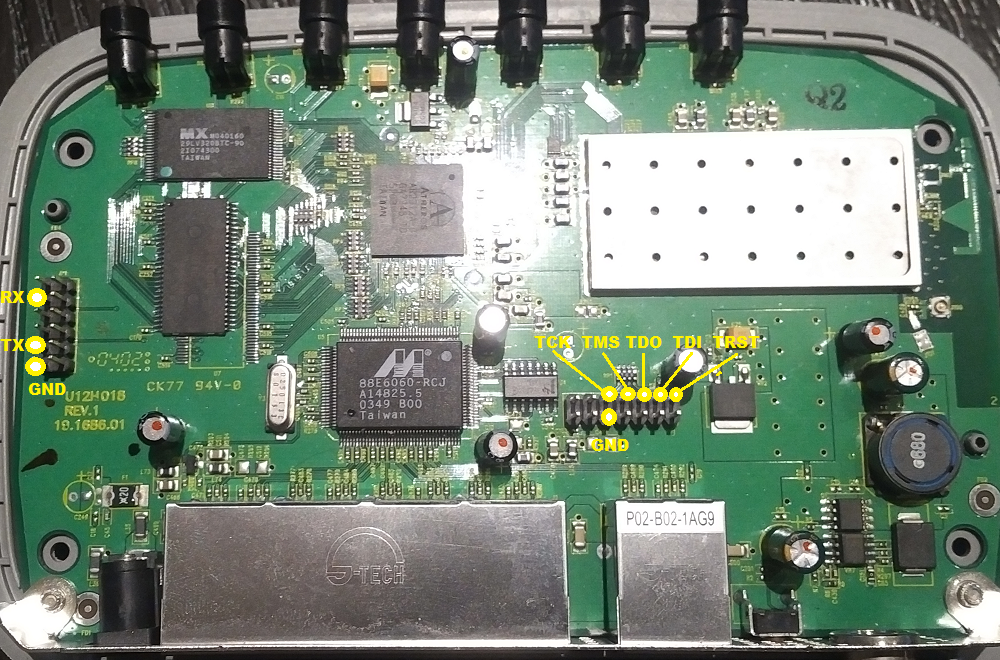
I used the JTAGulator to identify the UART (img) (output) and the JTAG (img) (output) pinouts. Below are the mappings for the UART and the JTAG. You can confirm the JTAG pinout from this DD-WRT forum post. You can confirm the UART pinout from here.
You can now connect to the WGT624v2 over serial and monitor the boot process. Plenty of online resources show how to send a magic packet to enable Telnet on Netgear devices. The credentials they list are Gearbuy / Geardog (case sensitive). I found that these creds did not work over the serial connection. I don’t know if the previous owner changed the password. As of yet I have not done a reset of the device. It would be unlikely the previous owner would change the password as after some guessing I found the password to be “password”. You can now authenticate to the device to obtain menu-command access. You will quickly find out that the OS for this device is VxWorks version 5.4.2. We will leave exploring the OS to another time.
While connected via UART we also connect via JTAG and use the open source Open On-Chip Debugger (openocd). This software will allow use to interface with the device over JTAG (hopefully). Many options exist to configure openocd to communicate with the device and a lot of the information needs to be obtained from datasheets (Winbond, MXIC, Atheros) for the chips on board. For our purposes we get a little lucky and can leverage an existing configuration script.
Before leveraging a previous configuration script we will try to create our own. Openocd is capable of “auto probing” to try and identify the CPU. The CPU is the main target we will need in order to communicate with the device.
root@KALI:~# openocd -f /usr/share/openocd/scripts/interface/ftdi/dp_busblaster.cfg -c "adapter_khz 100; transport select jtag"
Open On-Chip Debugger 0.10.0
Licensed under GNU GPL v2
For bug reports, read
http://openocd.org/doc/doxygen/bugs.html
Info : If you need SWD support, flash KT-Link buffer from https://github.com/bharrisau/busblaster
and use dp_busblaster_kt-link.cfg instead
adapter speed: 100 kHz
jtag
Info : clock speed 100 kHz
Warn : There are no enabled taps.  AUTO PROBING MIGHT NOT WORK!!
Error: JTAG scan chain interrogation failed: all zeroes
Error: Check JTAG interface, timings, target power, etc.
Error: Trying to use configured scan chain anyway...
Error: IR capture error at bit 0, saw 0x00 not 0x...3
Warn : Bypassing JTAG setup events due to errors
Warn : gdb services need one or more targets defined
Unfortunately the “auto probing” fails. We identified the CPU as an AR2312A. There is the following target script for the AR2313 (atheros_ar2313.cfg)
set _CHIPNAME ar2313
set _CPUTAPID 0x00000001
jtag newtap $_CHIPNAME cpu -irlen 5 -expected-id $_CPUTAPID
set _TARGETNAME $_CHIPNAME.cpu
target create $_TARGETNAME mips_m4k -endian big -chain-position $_TARGETNAMEroot@KALI:~# openocd -f /usr/share/openocd/scripts/interface/ftdi/dp_busblaster.cfg -f /usr/share/openocd/scripts/target/atheros_ar2313.cfg -c "adapter_khz 100; transport select jtag; reset_config trst_and_srst"
Open On-Chip Debugger 0.10.0+dev-00622-g322d2fa1 (2018-12-17-06:47)
Licensed under GNU GPL v2
For bug reports, read
http://openocd.org/doc/doxygen/bugs.html
Info : If you need SWD support, flash KT-Link buffer from https://github.com/bharrisau/busblaster
and use dp_busblaster_kt-link.cfg instead
Info : auto-selecting first available session transport "jtag". To override use 'transport select <transport>'.
ar2313.cpu
adapter speed: 100 kHz
Warn : Transport "jtag" was already selected
trst_and_srst separate srst_gates_jtag trst_push_pull srst_open_drain connect_deassert_srst
Info : Listening on port 6666 for tcl connections
Info : Listening on port 4444 for telnet connections
Info : clock speed 100 kHz
Info : JTAG tap: ar2313.cpu tap/device found: 0x00000001 (mfg: 0x000 (<invalid>), part: 0x0000, ver: 0x0)
Info : Listening on port 3333 for gdb connections
root@KALI:~# telnet localhost 4444
Trying ::1...
Trying 127.0.0.1...
Connected to localhost.
Escape character is '^]'.
Open On-Chip Debugger
> reg
===== mips32 registers
(0) r0 (/32)
(1) r1 (/32)
(2) r2 (/32)
(3) r3 (/32)
(4) r4 (/32)
(5) r5 (/32)
(6) r6 (/32)
(7) r7 (/32)

. . . SNIP . . .

(71) fir (/32): 0x00000000
> halt
MIPS32 only implemented
target halted in MIPS32 mode due to debug-request, pc: 0x80242ba0
> reg
===== mips32 registers
(0) r0 (/32): 0x00000000
(1) r1 (/32): 0x804D0000
(2) r2 (/32): 0x00000002
(3) r3 (/32): 0x00011CB5
(4) r4 (/32): 0x80FA56E0
(5) r5 (/32): 0x00000000
(6) r6 (/32): 0x80FA56E0
(7) r7 (/32): 0x80FA56E0
(
. . . SNIP . . .

(37) pc (/32): 0x80242BA0

. . . SNIP . . .

> reset halt
JTAG tap: ar2313.cpu tap/device found: 0x00000001 (mfg: 0x000 (<invalid>), part: 0x0000, ver: 0x0)
target halted in MIPS32 mode due to debug-request, pc: 0xbfc00000
> reg
===== mips32 registers
(0) r0 (/32): 0x00000000
(1) r1 (/32): 0x00080000
(2) r2 (/32): 0x00000002
(3) r3 (/32): 0x00011CB5
(4) r4 (/32): 0x80FA56E0
(5) r5 (/32): 0x00000000
(6) r6 (/32): 0x80FA56E0

. . . SNIP . . .

(37) pc (/32): 0xBFC00000

. . . SNIP . . .

> step; reg pc
target halted in MIPS32 mode due to single-step, pc: 0xbfc00004
pc (/32): 0xBFC00004

. . . SNIP . . .

> step; reg pc
target halted in MIPS32 mode due to single-step, pc: 0xbfc00554
pc (/32): 0xBFC00554
> dump_image 0xBFC00554.bin 0xBFC00554 0x1000
dumped 4096 bytes in 7.579714s (0.528 KiB/s)We did a dump of memory (dump_image) and quickly examine what we obtained via the “strings” command. The result shows that we got hit by the watchdog timer. We will need to conduct additional research on how to avoid this. That will be for another post. The next post will deal with a setup of the board configuration file that includes communication with the device’s flash. Maybe a post of interaction with GDB will follow as well.
root@KALI:~# strings 0xBFC00554.bin
. . . SNIP . . .
ar531x rev
 firmware startup...
SDRAM TEST...
PASSED
FAILED at address:
 exp
 got
panic: romStart failed!
0123456789abcdef<
NMI (watchdog): ErrorPC:
sysConsoleDump: type
. . . SNIP . . .
Resources
https://www.netgear.com/support/product/WGT624v2.aspx
https://wikidevi.com/wiki/Netgear_WGT624v2
https://wikidevi.com/wiki/Netgear_WGT624v1
https://wikidevi.com/wiki/Atheros_AR2313
http://www.jedge.com/docs/winbond_W981216BH-75.pdf
http://www.jedge.com/docs/Atheros_AR2112.pdf
http://www.jedge.com/docs/Macronix International mx29lv320.pdf
http://www.atheros.com:80/pt/AR5002AP-GBulletin.htm
https://forum.dd-wrt.com/phpBB2/viewtopic.php?t=33975
https://forum.archive.openwrt.org/viewtopic.php?id=12672
https://oldwiki.archive.openwrt.org/oldwiki/OpenWrtDocs/Hardware/Netgear/WGT624
https://forum.archive.openwrt.org/viewtopic.php?id=14205
https://community.ubnt.com/t5/NanoStation-and-Loco-Devices/flash-memory-address-of-redboot/td-p/257677
https://www.youtube.com/watch?v=IwnPbNhd2GM
http://techwithdave.davevw.com/2013/07/getting-started-with-openocd.html