 Building Openwrt for the GL-iNet
This tutorial will detail how to obtain the Openwrt source code and compile it to suite our needs with the GL-iNet. This software build will allow us to use the GL-iNet’s two Ethernet ports to bypass 802.1x port security as detailed in Part 2 of these tutorials as well as the software required for future write-ups.
Segmentation Faults
UPDATE: 8/2/2016 – Sweet baby Jesus (I like the baby Jesus) they fixed the segmentation fault for arptables! The trunk version of Chaos Calmer has a patch that fixes it. Look for a new tutorial soon.
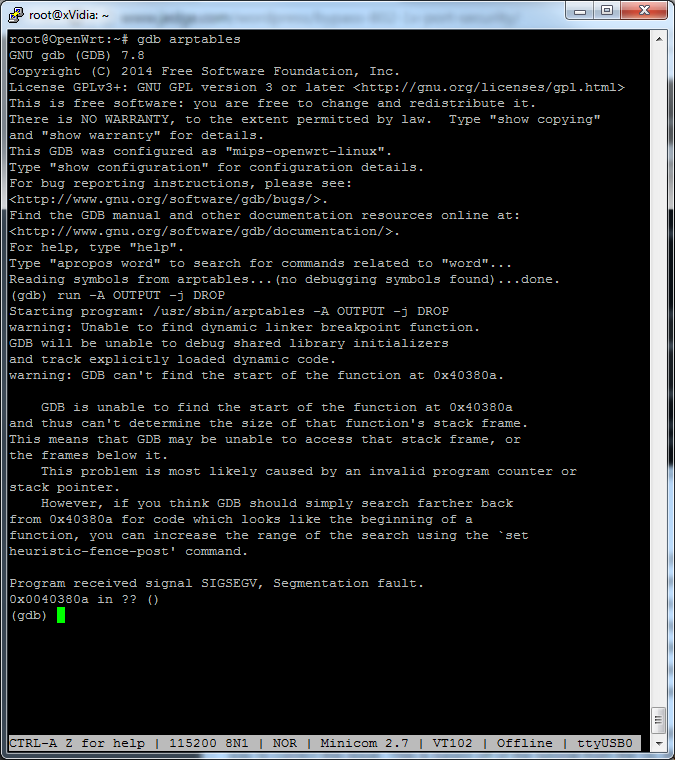
The utility arptables (version 0.0.4) in Openwrt Barriar Breaker 14.07 (BB) and Openwrt Chaos Calmer (CC) (bleeding edge) for the Atheros AR9331 chipset does not work. A segmentation fault is created whenever it is used. We have to settle on Attitude Adjustment 12.09 (AA), which uses arptables 0.0.3-4, for our operating system. Trust me I tried to get the latest to work with the binaries, compiling from source, updating to the latest arptables source and compiling…nothing.
But for now I want something that works. Embedded environments still show you that with Linux it can still be easier said than done.
Software Support
The one issue with AA is that it does not support the GL-iNet by default. I’m going to show the super easy way to correct this issue. This is based off of the tutorial from the GL-iNet.com website but cleaned up a bit. It may not be the most correct way but it works. Also with the GL-iNet tutorial it does not address AA lack of support for any device with 16mb flash. Forums will tell you what to add to which file. I skip that process and cheat a little bit. We will need to download the source for AA and the latest trunk of Openwrt to steal a pair of files. So let us start with the commands!
Obtaining Openwrt
*Note: Everything is done from the latest version of Ubuntu LTS (14.04).
Okay…before the commands I recommend you RTFM and go to the reference links at the bottom to learn more about the commands I’m telling you to enter. For this tutorial we will work out of your home directory. We will download the latest code for Openwrt as well as the code for Attitude Adjustment 12.09 (AA) and a patch from the GL-iNet website. We will only need two files from the trunk version of Openwrt so that we can compile the 16mb image of AA for the GL-iNet. The two files we need from Openwrt trunk are ar71xx/image/Makefile and firmware-utils/src/ mktplinkfw.c. But first we will apply the AA patch provided by GL-iNet using the utility quilt.
Make sure your environment has the software required, including quilt.
$ sudo apt-get update
$ sudo apt-get install git-core build-essential libssl-dev subversion libncurses5-dev zlib1g-dev gawk gcc-multilib flex gettext quilt xsltproc libxml-parser-perl mercurial bzr ecj cvs unzip
To setup quilt you want a file called .quiltrc in your home directory with the following lines:
QUILT_DIFF_ARGS="--no-timestamps --no-index -pab --color=auto"
QUILT_REFRESH_ARGS="--no-timestamps --no-index -pab"
QUILT_PATCH_OPTS="--unified"
QUILT_DIFF_OPTS="-p"
EDITOR="nano"
How you accomplish this is up to you. Open gedit and paste, open vim and paste, or do the following from the command line.
$ echo -e QUILT_DIFF_ARGS="--no-timestamps --no-index -pab --color=auto"'\n'QUILT_REFRESH_ARGS="--no-timestamps --no-index -pab"'\n'QUILT_PATCH_OPTS="--unified"'\n'QUILT_DIFF_OPTS="-p"'\n'EDITOR="nano" > ~/.quiltrc
Move to your home directory obtain AA, update and download the package source files, and patch it using quilt.
$ cd ~/
$ git clone git://git.openwrt.org/12.09/openwrt.git attitude_adjustment
$ cd attitude_adjustment
~/attitude_adjustment$ mkdir patches
~/attitude_adjustment$ echo 01-gl-inetAA16MiB.patch > patches/series
~/attitude_adjustment$ git clone https://github.com/smrx86/gl-inet.git smrx86
~/attitude_adjustment$ cp smrx86/patches/01-gl-inetAA16MiB.patch patches
~/attitude_adjustment$ echo 01-gl-inetAA16MiB.patch >> patches/series
~/attitude_adjustment$ quilt push -a
Now we can actually build our firmware and the packages we need for our project. Download and install all available “feeds”, create our configuration file to build what we need.
$ cd attitude_adjustment
~/attitude_adjustment$ ./scripts/feeds update -a
~/attitude_adjustment$ ./scripts/feeds install -a
~/attitude_adjustment$ cd package
~/attitude_adjustment/package$ git clone git://git.openwrt.org/12.09/packages.git
~/attitude_adjustment/package$ cd ..
~/attitude_adjustment$ make menuconfig
The easiest thing to do is select every available package and compile it all. Just have something to do while you wait…like watch every episode of the X-files on Netflix. Pretty much what I’m doing as I create this tutorial (you probably will only get through one episode anyway). This way you can install a package when you figure out you need it. Truthfully that is a bad idea (not the X-files part) because you do not know what packages won’t compile. So listen to me and choose the following packages below.
Modules: kmod-ebtables, kmod-ebtables-ipv4, kmod-arptables, kmod-llc, kmod-stp, and kmod-bridge
Libraries: libpcap
Software and Utilities: tcpdump, ebtables, arptables, iptables, and mii-tool
Iptables modules: iptables-mod-conntrack-extra, iptables-mod-extra, iptables-mod-filter, iptables-mod-iface, iptables-mod-ipopt, iptables-mod-ipset, iptables-mod-ipv4options, iptables-mod-nat-extra, iptables-mod-rawnat, iptables-mod-tee
You can find them within the menu as follows.
Network —> (mii-tool & tcpdump)
Network —>Firewall (arptables & ebtables)
Network —>Firewall—>iptables (iptables-mod-conntrack-extra, iptables-mod-extra, iptables-mod-filter, iptables-mod-iface, iptables-mod-ipopt, iptables-mod-ipset, iptables-mod-ipv4options, iptables-mod-nat-extra, iptables-mod-rawnat, iptables-mod-tee) “
Kernel modules —>Netfilter Extensions (kmod-arptables, kmod-ebtables, kmod-ebtables-ipv4, kmod-ebtables-ipv6)
Kernel modules —>Network Support (kmod-bridge, kmod-llc, kmod-stp)
Libraries —>(libpcap)
Base system —>busybox Networking Utilities —>arp
SIDE NOTE: You may also want to create the modules to allow for USB thumb drive file system support.
Kernel modules —>Filesystems (kmod-fs-ext4, kmod-fs-ntfs & kmod-fs-vfat)
Kernel modules —>USB Support (kmod-usb-ohci, kmod-usb-uhci, kmod-usb2, kmod-usb-storage, kmod-usb-storage-extras)
SIDE-SIDE NOTE: You will also need language support for the file system. I’m installing support for US & Canada. Please see http://wiki.openwrt.org/doc/howto/storage for the language file you will need to install.
Kernel modules —>Native Language Support (kmod-nls-cp437, kmod-nls-base & kmod-nls-iso8859-1)
Compile
$ cd attitude_adjustment
~/attitude_adjustment$ make V=99
The compiled firmware openwrt-ar71xx-generic-gl-inet-v1-squashfs-factory.bin is located in ~/attitude_adjustment/bin/ar71xx.
Flashing Your Device
Documenting how to upgrade (or downgrade) the firmware of your GL-iNet is tricky as I don’t know the state of your device so we are going to use a method I’m sure you haven’t messed with. We are going to use the U-boot Web Method of upgrading. You will need to pry open your GL-iNet and connect a serial to USB adapter as documented from the GL-iNet website. Visit the two links below.
http://www.gl-inet.com/docs/smartrouter/?diy_hardware.html
http://www.gl-inet.com/docs/smartrouter/?diy_serial.html
Then boot your device and enter the web failsafe mode following the directions also found on the GL-iNet website.
http://www.gl-inet.com/docs/smartrouter/?diy_flashing.html
Connect to your USB serial device and then plug in your GL-iNet. Immediately hit the “F” key to enter the U-boot mode and enter httpd to start the failsafe web server. We will need to connect to the WAN port and assign an IP address in the 192.168.1.0/24 range, open a web browser, and go to http://192.168.1.1
From the web interface upload the firmware you compiled. It should be called openwrt-ar71xx-generic-gl-inet-6416A-v1-squashfs-factory.bin.
Now we actually get to set this sucker up with some useful tools!
Install and Configure
We created the firmware image and installed/flashed it to the device. Now let us modify some configuration settings and install the packages we compiled.
When building the software image and packages I did not have us remove dnsmasq, the firewall, or dropbear (ssh) packages. Let us disable the firewall and dnsmasq and modify the network configuration file. This will become important for Part 2 of these tutorials but for now it makes it easier for us to connect the device to the network and transfer over our files.
root@OpenWrt:/# /etc/init.d/firewall stop
root@OpenWrt:/# /etc/init.d/firewall disable
root@OpenWrt:/# /etc/init.d/dnsmasq stop
root@OpenWrt:/# /etc/init.d/dnsmasq disable
root@OpenWrt:/# vim /etc/config/network
Below are the current default settings for /etc/config/network
config interface 'loopback'
option ifname 'lo'
option proto 'static'
option ipaddr '127.0.0.1'
option netmask '255.0.0.0'

config interface 'lan'
option ifname 'eth1'
option type 'bridge'
option proto 'static'
option ipaddr '192.168.1.1'
option netmask '255.255.255.0'

config interface 'wan'
option ifname 'eth0'
option proto 'dhcp'
Modify it by commenting out the middle section (for now).
config interface 'loopback'
option ifname 'lo'
option proto 'static'
option ipaddr '127.0.0.1'
option netmask '255.0.0.0'

#config interface 'lan'
# option ifname 'eth1'
# option type 'bridge'
# option proto 'static'
# option ipaddr '192.168.1.1'
# option netmask '255.255.255.0'

config interface 'wan'
option ifname 'eth0'
option proto 'dhcp'
I make these changes because my default home network is 192.168.1.0/24. I assume your environment has a DHCP server. We will plug our network cable into the WAN port. After making the changes let us restart the network so the changes take effect.
root@OpenWrt:/# /etc/init.d/network restart
You will also need to assign a password to root.
root@OpenWrt:/# passwd
Changing password for root
New password:
Retype password:
Password for root changed by root
From the workstation where you compiled the image and packages we will transfer the packages over to the device via the Secure Shell protocol (ssh) specifically Secure Copy (scp). You will need to run ifconfig to get the device IP address. For this document the IP address assigned to my device was 192.168.1.78. This also begs the question that you do know how to plug in a device into another device via a network cable and have that device assign the other device an IP address…and that you even know what an Internet Protocol address is.
From your workstation.
$ cd ~/attitude_adjustment/bin/ar71xx/packages
~/attitude_adjustment/bin/ar71xx/packages$ scp *ebtables* *arptables* kmod-llc* kmod-bridge* kmod-stp* tcpdump_* libpcap* mii-tool* root@192.168.1.78:/tmp
You should see the following (reply yes to the host authenticity question).
The authenticity of host '192.168.1.78 (192.168.1.78)' can't be established.
RSA key fingerprint is 12:d5:23:3e:af:75:28:78:fb:e8:08:86:24:80:69:c0.
Are you sure you want to continue connecting (yes/no)? yes
Warning: Permanently added '192.168.1.78' (RSA) to the list of known hosts.
root@192.168.1.74's password:
ebtables_2.0.10-4-1_ar71xx.ipk 100% 58KB 57.5KB/s 00:00
ebtables-utils_2.0.10-4-1_ar71xx.ipk 100% 4034 3.9KB/s 00:00
kmod-ebtables_3.3.8-1_ar71xx.ipk 100% 17KB 17.4KB/s 00:00
kmod-ebtables-ipv4_3.3.8-1_ar71xx.ipk 100% 4735 4.6KB/s 00:00
kmod-ebtables-ipv6_3.3.8-1_ar71xx.ipk 100% 2468 2.4KB/s 00:00
kmod-ebtables-watchers_3.3.8-1_ar71xx.ipk 100% 6043 5.9KB/s 00:00
arptables_0.0.3-4-1_ar71xx.ipk 100% 20KB 20.0KB/s 00:00
kmod-arptables_3.3.8-1_ar71xx.ipk 100% 8814 8.6KB/s 00:00
kmod-llc_3.3.8-1_ar71xx.ipk 100% 744 0.7KB/s 00:00
kmod-bridge_3.3.8-1_ar71xx.ipk 100% 739 0.7KB/s 00:00
kmod-stp_3.3.8-1_ar71xx.ipk 100% 755 0.7KB/s 00:00
tcpdump_4.2.1-3_ar71xx.ipk 100% 259KB 259.2KB/s 00:00
libpcap_1.1.1-2_ar71xx.ipk 100% 82KB 82.0KB/s 00:00
mii-tool_1.9.1.1-1_ar71xx.ipk 100% 6009 5.9KB/s 00:00
SIDE NOTE: If you plan on working on Part 2 & 3 of these tutorials you will also want to copy over the modules to allow for USB storage and file system support.
~/attitude_adjustment/bin/ar71xx/packages$ scp kmod-usb-storage* kmod-fs* kmod-usb2* kmod-usb-ohci* kmod-usb-core* kmod-lib-crc16* kmod-scsi-core* root@192.168.1.78:/tmp
root@192.168.1.78's password:
kmod-usb-storage_3.3.8-1_ar71xx.ipk 100% 23KB 22.5KB/s 00:00
kmod-usb-storage-extras_3.3.8-1_ar71xx.ipk 100% 31KB 31.4KB/s 00:00
kmod-fs-ext4_3.3.8-1_ar71xx.ipk 100% 178KB 178.2KB/s 00:00
kmod-fs-ntfs_3.3.8-1_ar71xx.ipk 100% 53KB 53.5KB/s 00:00
kmod-fs-vfat_3.3.8-1_ar71xx.ipk 100% 35KB 35.4KB/s 00:00
kmod-usb2_3.3.8-1_ar71xx.ipk 100% 24KB 24.4KB/s 00:00
kmod-usb-ohci_3.3.8-1_ar71xx.ipk 100% 13KB 13.1KB/s 00:00
kmod-usb-core_3.3.8-1_ar71xx.ipk 100% 68KB 67.8KB/s 00:00
kmod-lib-crc16_3.3.8-1_ar71xx.ipk 100% 2109 2.1KB/s 00:00
kmod-scsi-core_3.3.8-1_ar71xx.ipk 100% 67KB 67.1KB/s 00:00
SIDE-SIDE NOTE: Don’t forget your language files
~/attitude_adjustment/bin/ar71xx/packages$ scp kmod-nls* root@192.168.1.78:/tmp
root@192.168.1.78's password:
kmod-nls-base_3.3.8-1_ar71xx.ipk 100% 3894 3.8KB/s 00:00
kmod-nls-cp437_3.3.8-1_ar71xx.ipk 100% 2835 2.8KB/s 00:00
kmod-nls-iso8859-1_3.3.8-1_ar71xx.ipk 100% 2489 2.4KB/s 00:00
From your device install the packages you transferred over.
root@OpenWrt:/# cd /tmp
root@OpenWrt:/tmp# opkg install *.ipk
Installing arptables (0.0.3-4-1) to root...
Installing kmod-arptables (3.3.8-1) to root...
Installing ebtables-utils (2.0.10-4-1) to root...
Installing kmod-ebtables (3.3.8-1) to root...
Installing ebtables (2.0.10-4-1) to root...
Package ebtables (2.0.10-4-1) installed in root is up to date.
Package kmod-arptables (3.3.8-1) installed in root is up to date.
Installing kmod-bridge (3.3.8-1) to root...
Installing kmod-stp (3.3.8-1) to root...
Installing kmod-llc (3.3.8-1) to root...
Installing kmod-ebtables-ipv4 (3.3.8-1) to root...
Installing kmod-ebtables-ipv6 (3.3.8-1) to root...
Installing kmod-ebtables-watchers (3.3.8-1) to root...
Package kmod-ebtables (3.3.8-1) installed in root is up to date.
Installing kmod-fs-ext4 (3.3.8-1) to root...
Installing kmod-lib-crc16 (3.3.8-1) to root...
Installing kmod-fs-ntfs (3.3.8-1) to root...
Installing kmod-nls-base (3.3.8-1) to root...
Installing kmod-fs-vfat (3.3.8-1) to root...
Package kmod-lib-crc16 (3.3.8-1) installed in root is up to date.
Package kmod-llc (3.3.8-1) installed in root is up to date.
Package kmod-nls-base (3.3.8-1) installed in root is up to date.
Installing kmod-nls-cp437 (3.3.8-1) to root...
Installing kmod-nls-iso8859-1 (3.3.8-1) to root...
Installing kmod-scsi-core (3.3.8-1) to root...
Package kmod-stp (3.3.8-1) installed in root is up to date.
Installing kmod-usb-core (3.3.8-1) to root...
Installing kmod-usb-ohci (3.3.8-1) to root...
Installing kmod-usb-storage-extras (3.3.8-1) to root...
Installing kmod-usb-storage (3.3.8-1) to root...
Package kmod-usb-storage (3.3.8-1) installed in root is up to date.
Installing kmod-usb2 (3.3.8-1) to root...
Installing libpcap (1.1.1-2) to root...
Installing mii-tool (1.9.1.1-1) to root...
Installing tcpdump (4.2.1-3) to root...
Configuring kmod-scsi-core.
[ 208.140000] SCSI subsystem initialized
Configuring kmod-nls-base.
Configuring kmod-usb-core.
Configuring kmod-usb-storage.
[ 208.330000] Initializing USB Mass Storage driver...
[ 208.330000] usbcore: registered new interface driver usb-storage
[ 208.340000] USB Mass Storage support registered.
Configuring kmod-llc.
Configuring kmod-stp.
Configuring kmod-ebtables.
[ 208.400000] Ebtables v2.0 registered
Configuring kmod-bridge.
Configuring kmod-arptables.
[ 208.620000] arp_tables: (C) 2002 David S. Miller
Configuring arptables.
Configuring ebtables.
Configuring mii-tool.
Configuring kmod-lib-crc16.
Configuring kmod-ebtables-watchers.
Configuring kmod-usb-ohci.
Configuring kmod-fs-vfat.
Configuring kmod-usb2.
Configuring libpcap.
Configuring tcpdump.
Configuring kmod-fs-ext4.
Configuring kmod-ebtables-ipv4.
Configuring kmod-ebtables-ipv6.
Configuring kmod-nls-cp437.
Configuring ebtables-utils.
Configuring kmod-fs-ntfs.
[ 209.310000] NTFS driver 2.1.30 [Flags: R/O MODULE].
Configuring kmod-nls-iso8859-1.
Configuring kmod-usb-storage-extras.
[ 209.420000] usbcore: registered new interface driver ums-alauda
[ 209.440000] usbcore: registered new interface driver ums-cypress
[ 209.460000] usbcore: registered new interface driver ums-datafab
[ 209.480000] usbcore: registered new interface driver ums-freecom
[ 209.500000] usbcore: registered new interface driver ums-isd200
[ 209.520000] usbcore: registered new interface driver ums-jumpshot
[ 209.540000] usbcore: registered new interface driver ums-karma
[ 209.560000] usbcore: registered new interface driver ums-sddr09
[ 209.580000] usbcore: registered new interface driver ums-sddr55
[ 209.600000] usbcore: registered new interface driver ums-usbat
Now you have your GL-iNet ready for our other tutorials! Let’s head to Part 2 to configure this bad-boy to bypass 802.1x based port security.
References
Openwrt Buildroot Howto: http://wiki.openwrt.org/doc/howto/buildroot.exigence
GL-iNet Compile for AA Howto: http://www.gl-inet.com/w/?p=398
The actual patch for GL-iNet: https://gist.github.com/cj1324/7131925